In this article, we will guide you through the process of setting up Weaviate on Azure with Docker Compose and Azure Multi-Container App. Leveraging the capabilities of Web App for Containers provides a flexible and efficient way to utilize Docker images, enabling seamless deployment and management within the Azure environment. With the powerful features offered by Azure’s App Service on Linux, you can streamline the process of hosting your applications, while also benefiting from the scalability and reliability of the Azure platform. Dive into the step-by-step instructions and gain insights on how to harness the potential of Weaviate deployed with Docker Compose in combination with Azure’s Multi-Container App, empowering you to optimize your development and deployment workflows.
If you don’t have an Azure subscription, create an Azure free account before you begin.
In this article
Prerequisites
- If you don’t have an existing container registry you will can quickly create Azure Container Registry
Create a resource group
A resource group serves as a logical container where Azure resources, including web apps, databases, and storage accounts, are deployed and administered. This allows you the convenience of deleting the entire resource group in a single step at a later stage, streamlining management tasks.

Create a new Azure Resource and search for Resource Group.
It is essential to choose a distinct and meaningful name for your resource group in order to easily identify and manage it within your Azure environment. By doing so, you can ensure that the resource group name reflects its purpose or the project it is associated with. Additionally, selecting the region closest to your geographic location is crucial for optimizing the performance of your resources and minimizing latency. This strategic decision allows your services to be in proximity to your users, resulting in improved speed and responsiveness. Therefore, carefully consider these factors when creating and configuring your resource group to establish an efficient and accessible environment for your Azure resources.
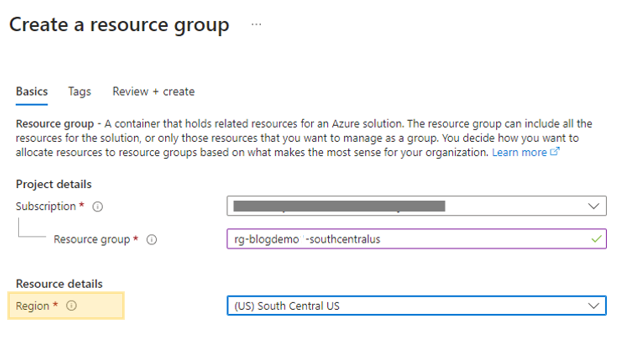
Once ready click Review + create.
Create an Azure App Service plan
We will create an App Service plan to allocate resource for the Weaviate multi-container web application. In order to ensure optimal performance and resource allocation, it is important to carefully select the appropriate App Service plan. Considering the specific requirements of the Weaviate multi-container web application, the creation of a Linux App Service plan within the same region as the resource group is essential. Here, the choice of the pricing tier is crucial. While the free B1 pricing tier can be used to complete initial exercises and basic functionality, it’s important to note that a higher tier will be required for advanced functionality and to meet the demands of a production environment. Therefore, it’s imperative to assess the specific needs and future growth expectations of the application when selecting the App Service plan, ensuring it aligns with the present and future requirements.
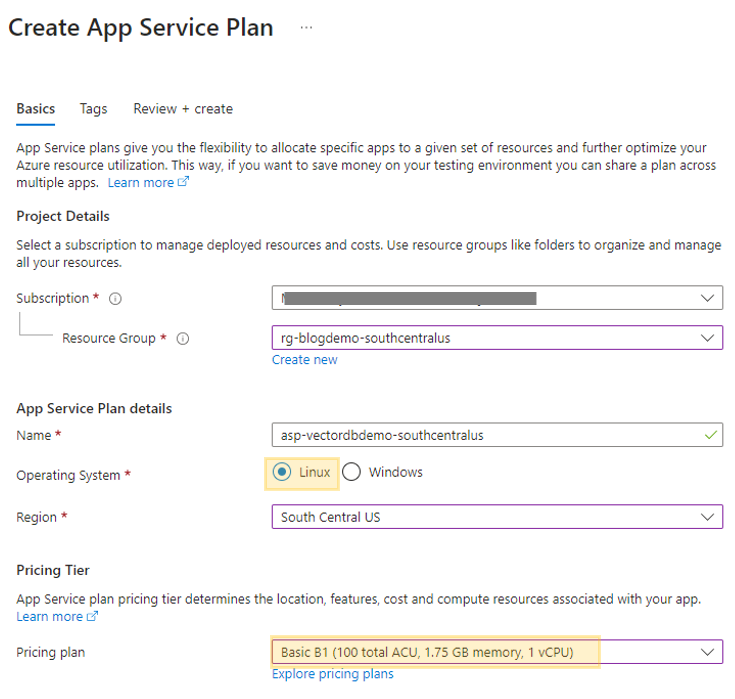
Once ready click Review + create.
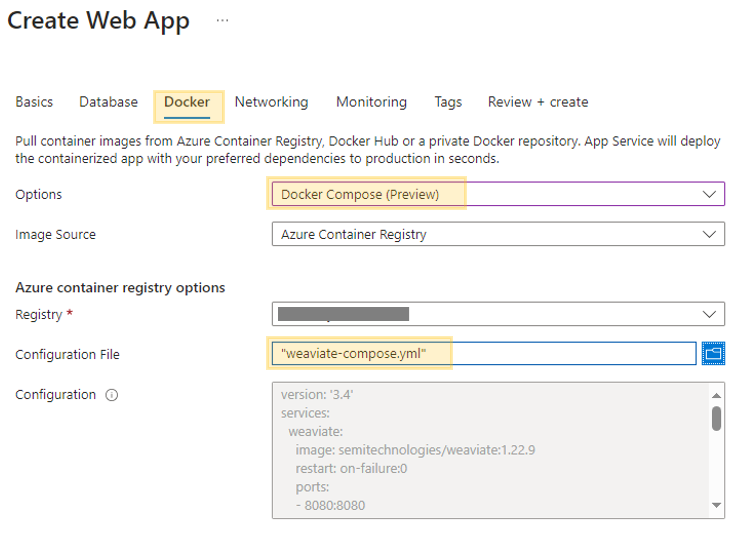
Create Docker compose file
We need to make a yml file for Docker compose. The file should be named “weaviate-compose.yml” and the following content should be copied into it. When copying, make sure to change AUTHENTICATION_API_ALLOWED_KEYS to your chosen key and add your email to AUTHENTICATION_APIKEY_USER.
This article does not cover Weaviate authentication/authorization; please review Weaviate documentation to secure your vector database.
---
version: '3.4'
services:
  weaviate:
    command:
    - --host
    - 0.0.0.0
    - --port
    - '8080'
    - --scheme
    - http
    image: semitechnologies/weaviate:1.23.7
    ports:
    - 8080:8080
    - 50051:50051
    volumes:
    - weaviate_data:/var/lib/weaviate
    restart: on-failure:0
    environment:
      TRANSFORMERS_INFERENCE_API: 'http://t2v-transformers:8080'
      QUERY_DEFAULTS_LIMIT: 25
      AUTHENTICATION_ANONYMOUS_ACCESS_ENABLED: 'false'
      AUTHENTICATION_APIKEY_ENABLED: 'true'
      AUTHENTICATION_APIKEY_ALLOWED_KEYS: '**your_key**'
      AUTHENTICATION_APIKEY_USERS: 'email@example.com'
      PERSISTENCE_DATA_PATH: '/var/lib/weaviate'
      DEFAULT_VECTORIZER_MODULE: 'text2vec-transformers'
      ENABLE_MODULES: 'text2vec-transformers'
      CLUSTER_HOSTNAME: 'node1'
  t2v-transformers:
    image: semitechnologies/transformers-inference:sentence-transformers-multi-qa-MiniLM-L6-cos-v1
    environment:
      ENABLE_CUDA: '0'
volumes:
  weaviate_data:
...
Create a Docker Compose app
When you create an Azure Web App using the App Service created earlier, choose Docker Container as the publish option and Linux as the operating system.
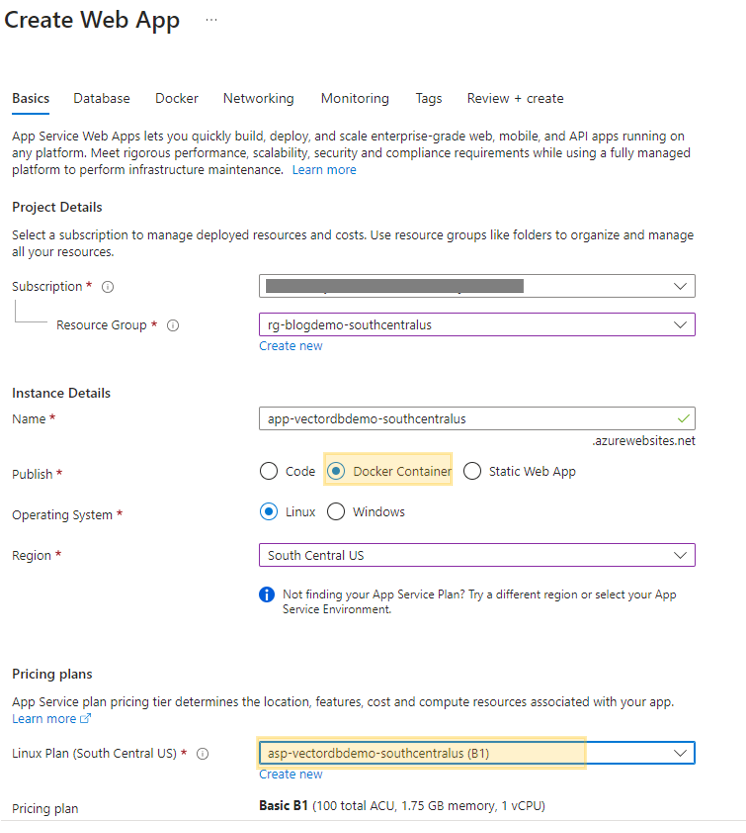
Navigating to the Docker tab and selecting Docker Compose is an essential step in this process. You’ll need to carefully choose the appropriate registry or the Azure Container Registry that you created during the prerequisite stage. Once you’ve selected the registry, proceed to upload the specific file “weaviate-compose.yml” that you created in the last step. This file is crucial for the successful implementation of the Docker Compose configuration.
Once ready click Review + create.
Persistent Storage
To prevent data from being lost when the containers stop, we will want to use persistent storage. This can be done by mounting an Azure Storage SMB File Share. Follow the instructions here to create an Azure SMB File Share.
Once you have a file share available, we can create a mount. To create a mount, go to Configuration, then click “new Azure Storage Mount” under Path mappings.

For the name, use weaviate_data as mentioned in the docker compose file. Choose your Azure File Share with the SMB protocol.

Click Ok to create your mount then Save the Azure Web App configuration changes.
Installation Validation
You can monitor the progress of Weaviate installation by accessing the deployment center logs. These logs contain detailed information about the installation status, allowing you to track the process and address any potential issues. Simply navigate to the Deployment Center to review the logs and gain valuable insights into the deployment process. This visibility enables you to ensure that the installation is proceeding smoothly and take necessary actions if any discrepancies arise.
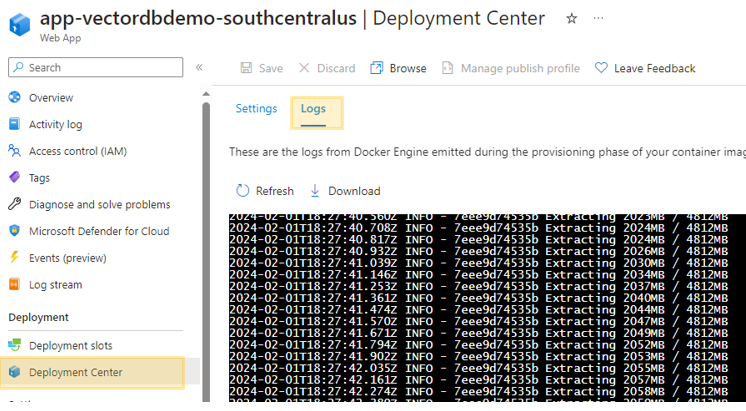
This process does take some time, and the Docker logs may not be immediately available.
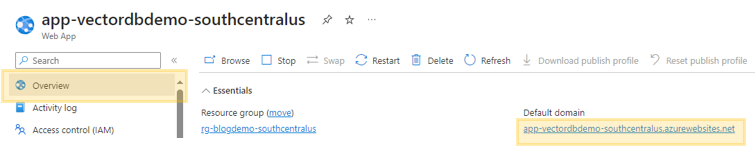
The message “initialized successfully and is ready to serve requests” in your logs means the setup and installation are done, and the web app is ready to use. Click on your Default Domain under the Web App Overview to verify Weaviate is up and running.
Clicking the Default Domain to view in your browser will display something similar to the following if everything has been set-up correctly:
{
    "links": [
        {
            "href": "/v1/meta",
            "name": "Meta information about this instance/cluster"
        },
        {
            "documentationHref": "https://weaviate.io/developers/weaviate/api/rest/schema",
            "href": "/v1/schema",
            "name": "view complete schema"
        },
        {
            "documentationHref": "https://weaviate.io/developers/weaviate/api/rest/schema",
            "href": "/v1/schema{/:className}",
            "name": "CRUD schema"
        },
        {
            "documentationHref": "https://weaviate.io/developers/weaviate/api/rest/objects",
            "href": "/v1/objects{/:id}",
            "name": "CRUD objects"
        },
        {
            "documentationHref": "https://weaviate.io/developers/weaviate/api/rest/classification,https://weaviate.io/developers/weaviate/api/rest/classification#knn-classification",
            "href": "/v1/classifications{/:id}",
            "name": "trigger and view status of classifications"
        },
        {
            "documentationHref": "https://weaviate.io/developers/weaviate/api/rest/well-known#liveness",
            "href": "/v1/.well-known/live",
            "name": "check if Weaviate is live (returns 200 on GET when live)"
        },
        {
            "documentationHref": "https://weaviate.io/developers/weaviate/api/rest/well-known#readiness",
            "href": "/v1/.well-known/ready",
            "name": "check if Weaviate is ready (returns 200 on GET when ready)"
        },
        {
            "documentationHref": "https://weaviate.io/developers/weaviate/api/rest/well-known#openid-configuration",
            "href": "/v1/.well-known/openid-configuration",
            "name": "view link to openid configuration (returns 404 on GET if no openid is configured)"
        }
    ]
}
This site is currently not secure and is accessible over the public web. If you plan on keeping this App Service and Web Up running, please research security and networking:
Security – Azure App Service | Microsoft Learn
Integrate your app with an Azure virtual network – Azure App Service | Microsoft Learn.
Vector Search Hands-On
Download sample dataset
Download and unzip a sample JSON dataset to load into your vector database. This contains snippets from the eighth edition of ‘Rocket Propulsion Elements’ for our vector search test.
Download: Rocket_Propulsion_Elements.zip.
Setup your python environment
We will be using python to load and query Weaviate – the sample code uses the Weaviate python client v3.
python -m venv venv
venv\Scripts\activate
pip install weaviate-client==3.24.1
Create Weaviate objects
To create a Book object and a Page object with a two-way cross reference between them, use the given code. Remember to update the url endpoint with your web app’s URL and the api_key with the key specified in the Docker compose yml file.
import weaviate

# Instantiate the client with the auth config
# Replace w/ your endpoint
client = weaviate.Client(url="https://[your-web-app].azurewebsites.net/",
# Replace w/ your Weaviate instance API key    auth_client_secret=weaviate.AuthApiKey(api_key="**your_key**")
)

print(client.is_ready())

book_schema = {
    "class": "Book",
    "properties": [
        {
            "name": "title",
            "dataType": ["text"]
        },
        {
            "name": "author",
            "dataType": ["text"]
        },
        {
            "name": "hasPages",
            "dataType": ["Page"]
        }
    ],
}

page_schema = {
    "class": "Page",
    "properties": [
        {
            "name": "chapter",
            "dataType": ["text"]
        },
        {
            "name": "body",
            "dataType": ["text"]
        },
        {
            "name": "pageNumber",
            "dataType": ["int"]
        },
        {
            "name": "inBook",
            "dataType": ["Book"]
        }
    ],
}

try:
    print(client.schema.create_class(book_schema))
except Exception as ex:
    print(ex)

print(client.schema.create_class(page_schema))
client.schema.property.create('Book', book_schema['properties'][2])
print(client.schema.get())
Load Data
The code below will help you upload the book and page data to Weaviate using the ‘Rocket_Propulsion_Elements.json’ file you downloaded. Don’t forget to replace the url endpoint with your web app’s URL and the api_key with the key from the Docker compose yml file.
import weaviate
import json

JSON_FILE = "Rocket_Propulsion_Elements.json"

# Instantiate the client with the auth config
# Replace w/ your endpoint
client = weaviate.Client(url="https://[your-web-app].azurewebsites.net/",
# Replace w/ your Weaviate instance API key    auth_client_secret=weaviate.AuthApiKey(api_key="**your_key**")
)


print(client.is_ready())

with open(JSON_FILE, 'r') as f:
    book_json = json.load(f)

book = book_json
book.pop('pages', None)
print(book)

book_id = client.data_object.create(book,'Book')
print('Book Added')
print(book_id)

with open(JSON_FILE, 'r') as f:
    book_json = json.load(f)

pages = book_json['pages']

for page in pages:
    page['pageNumber'] = page['page']
    page.pop('page',None)
    page_id = client.data_object.create(page, 'Page')

    print('Page Added')
    print(page_id)

    client.data_object.reference.add(
        from_class_name="Book",
        from_uuid=book_id,
        from_property_name="hasPages",
        to_class_name="Page",
        to_uuid=page_id,
    )

    client.data_object.reference.add(
        from_class_name="Page",
        from_uuid=page_id,
        from_property_name="inBook",
        to_class_name="Book",
        to_uuid=book_id,
    )

print('Done')
Search Weaviate
The following code is an example of performing a search on the book data we loaded into Weaviate. This search retrieves properties from cross reference data (book) when searching the page content and includes additional data, such as, the object id, distance and vector. Please review the Weaviate documents on search for additional details.
import weaviate
import json

# Instantiate the client with the auth config
# Replace w/ your endpoint
client = weaviate.Client(url="https://[your-web-app].azurewebsites.net/",
# Replace w/ your Weaviate instance API key    auth_client_secret=weaviate.AuthApiKey(api_key="**your_key**")
)

results = []

query = "supersonic combustion"
response = (
    client.query
    .get("Page", ["chapter", "body", "pageNumber", "inBook{ ... on Book{title}}"])
    .with_near_text({
        "concepts": [query],
        "distance": 0.6,
    })
    .with_limit(10)
    .with_additional(["id", "distance", "vector"])
    .do()
)


for page in response['data']['Get']['Page']:
    results.append({'id': page['_additional']['id'],
                    'title': page['inBook'][0]['title'], 'chapter': page['chapter'],'content':page['body'], 'page':page['pageNumber']})


print(json.dumps(response, indent=2))
print(f"Results: {len(results)}")
print(results)
Passing the concept (query) of “supersonic combustion” with a distance of 0.6 returns 10 pages (results). With the code json.dumps(response, indent=2), you would be able to access the distance and vectors, given that both were included in the .with_additional(["id", "distance", "vector"]) method. Furthermore, the results variable contains a JSON array comprising book, page, and content details. This allows for a comprehensive and detailed extraction of the search results, enabling a thorough analysis of the information obtained.
Results: 5
 [{'id': '731b070f-3399-456c-8d62-46565afddd74', 'title': 'Rocket Propulsion Elements', 'chapter': 'Chapter 1', 'content': '\nFuel Injection\nCompressor\nsection\nCombustion\nsection\nTurbine\nsection\nAfterburner\nand nozzle \nsection\nShaft\nFIGURE 1–1. Simplified schematic diagram of a turbojet engine.\nFIGURE 1–2. Simplified diagram of a ramjet with a supersonic inlet (converging and\ndiverging flow passage).\nto near their design flight speed to become functional. The primary applications of\nramjets with subsonic combustion have been in shipboard and ground-launched\nantiaircraft missiles. Studies of a hydrogen-fueled ramjet for hypersonic aircraft\nlook promising. The supersonic flight vehicle is a combination of a ramjet-driven\nhigh-speed airplane and a one- or two-stage rocket booster. It can travel at speeds\nup to a Mach number of 25 at altitudes of up to 50,000 m.\n1.2. ROCKET PROPULSION\nRocket propulsion systems
 can be classified according to the type of energy\nsource (chemical, nuclear, or solar), the basic function (booster stage, sustainer\nor upper stages, attitude control, orbit station keeping, etc.), the type of vehicle\n(aircraft, missile, assisted takeoff, space vehicle, etc.), size, type of propellant,\ntype of construction, or number of rocket propulsion units used in
 a given vehicle.\nAnother way is to classify by the method of producing thrust................................
Congratulations! You have successfully built a multi-container app in the Web App for Containers to run and test the vector database Weaviate!! This app can be used to create a Q&A Azure Machine Learning Prompt Flow. Find out more here: Azure Prompt Flow with Vector Search
Clean up
When it’s time to wrap up your work with the Azure services discussed in the previous article, it’s crucial to ensure their proper deletion. If these services are all part of the same resource group, the most direct approach is to delete the entire resource group. Just to clarify, the original services created were the Azure Container Registry, Azure App Service, and Azure Web App. By methodically following through with the deletion process, you can successfully conclude this phase of your Azure workflow.

Leave a reply to Jonathan Scholtes Cancel reply