
In this multi-part series, we embarked on a journey to harness the power of Azure Cosmos DB for MongoDB vCore. We set up our database and loaded our vector database in Part 1. The next phase, documented in Part 2, involved leveraging LangChain and Python FastAPI to craft a RAG (Retrieval-Augmented Generation) interface, empowering us to query and interact with our data in an intuitive manner. Now, as we delve into the culmination of our series in Part 3, we shift our focus to the creation of a sleek and dynamic React web user interface. This final installment brings together the critical components of our project, providing a user-friendly gateway to our AI.

In this article
- Prerequisites
- Install Node.js
- Download the Project
- Launch FastAPI from Part 2
- LangChain RAG with React Web User Interface
- Walkthrough of the React Project
Prerequisites
- If you don’t have an Azure subscription, create an Azure free account before you begin.
- Complete Part 2: LangChain RAG with React, FastAPI, Cosmos DB Vector: Part 2
Install Node.js
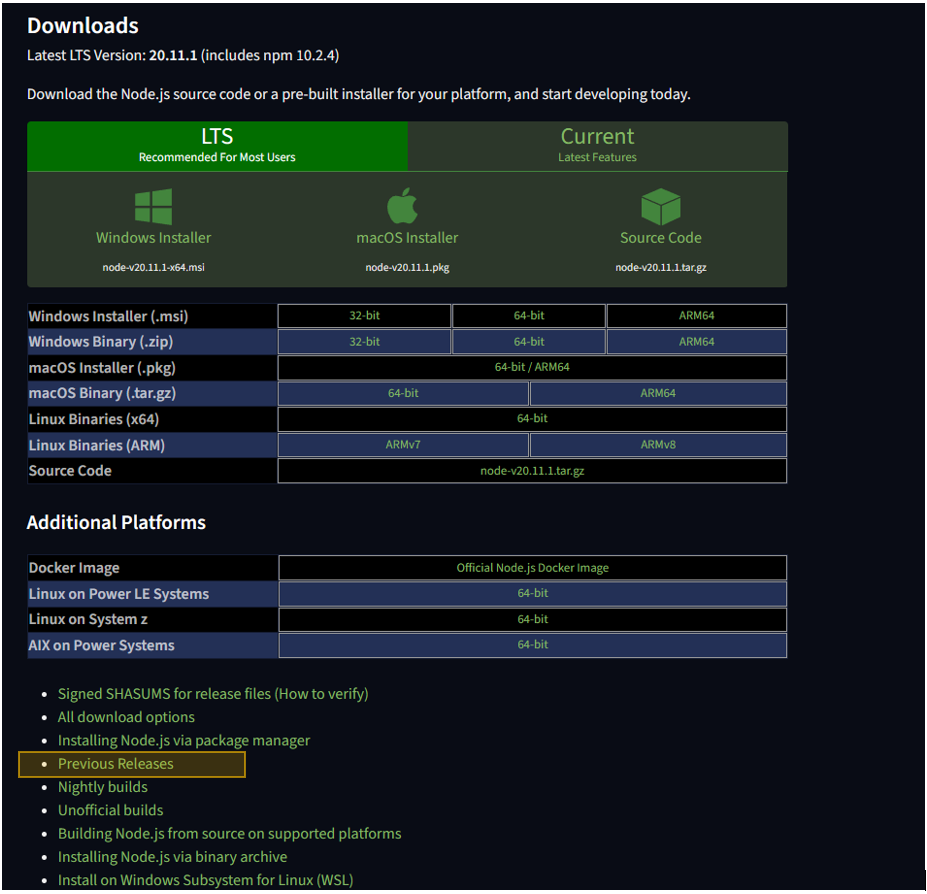
To run the React web application, Node.js is required. This project has been verified with the latest Long Term Support (LTS) version 20.11.1 at the time of this publication. Download and install Node.js to follow along with the code in this article. Head over to the Node.js download page and select ‘Previous Releases’.
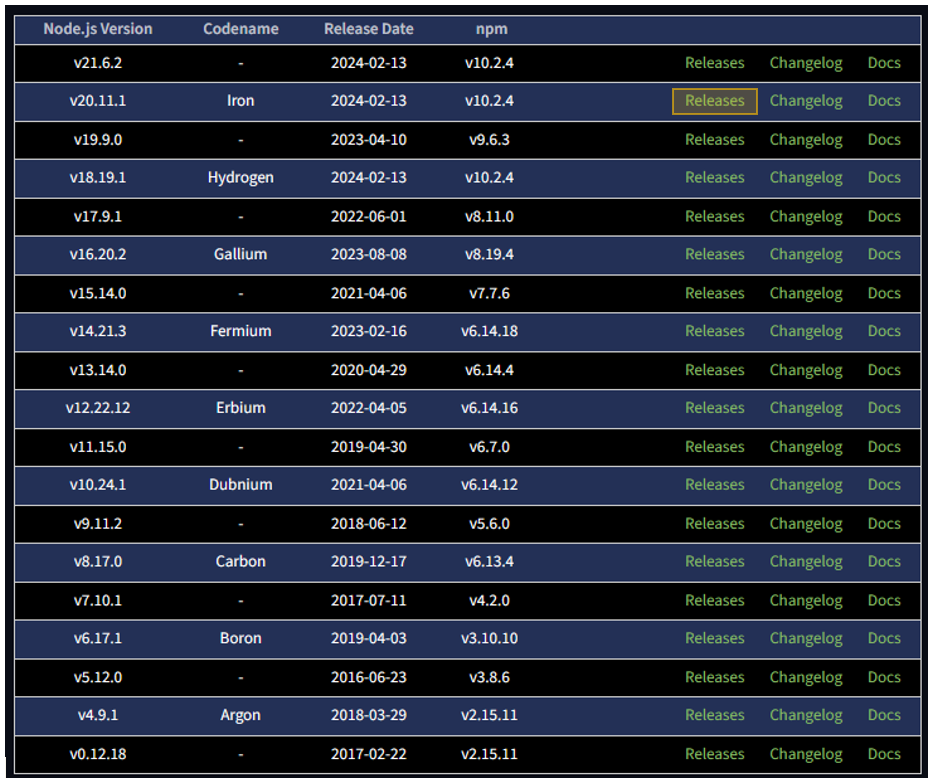
Select ‘Releases’ for v20.11.1.
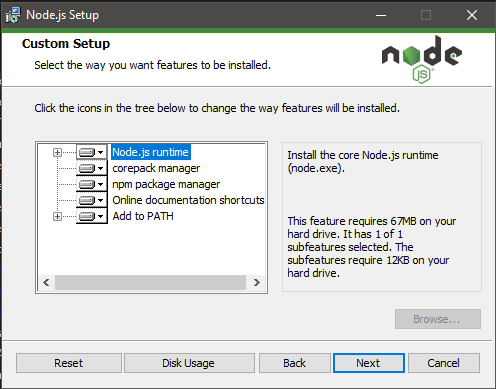
For the installation on Microsoft Windows, you have the option to download the MSI for a simplified setup.

During installation, make sure to install the Node Package Manager (NPM) as it is essential for this process. Also, ensure that Node.js is accessible from the operating system PATH, ‘Add to PATH’.
Validate the installation by executing the following command in a terminal or command prompt:
node --version v20.11.1
Download the Project
You can find the code for the project on my GitHub.

Clone the project from GitHub
Launch FastAPI from Part 2
We require the FastAPI service to be operational for the web interface to establish a connection. As detailed in Part 2, execute the provided commands within the demo_api directory to launch the server.
venv\Scripts\activate
python main.py
LangChain RAG with React Web User Interface
With the code downloaded and Node.js installed, it is necessary to proceed by installing the dependencies before testing out the React interface.
Run the following command from the demo_web directory to perform a clean install of project dependencies, this may take some time.
npm ciadded 1599 packages, and audited 1600 packages in 7m
Your results from executing this command may differ from mine, depending on your environment and the timing of the code execution (i.e. the number of packages and vulnerability issues).
Next, it is necessary to create a file named ‘.env’ within the demo_web directory in order to store the environment variables.
REACT_APP_API_HOST=http://127.0.0.1:8000| Environment Variable | Description |
|---|---|
| REACT_APP_API_HOST | Url to our FastAPI server. Default to our local machine: http://127.0.0.1:8000 |
Now, we have the ability to execute the following command from the demo_web directory to initiate the React web user interface.
npm startHere is a brief demonstration video showcasing the React web user interface.
Walkthrough of the React Project
The React project does not entail as much complexity as the initial two segments in this series. The first article dealt with the setup of Azure CosmosDB for MongoDB vector search, while the second article, being the heart of the project, focused on LangChain and Python FastAPI.
With regards to this project, the ‘Main.js’ file serves as the central module or user landing page, while the specialized ‘Search.js’ file is responsible for managing the Q&A functionality. In order to enhance file readability and ease of maintenance, the search functionality has been segmented into separate sections.

Main
Main serves as the crucial central component within the structure of the React application, being the designated point of entry for routing by the application.
import {React, Component } from 'react'
import Search from './Search/Search'
import './Main.css'

class App extends Component {
  constructor() {
    super()
    this.state = { question: '', searchResults: [] }
  }

  render() {
    return (
      <div className="Main">
        <div className="Main-Header">
          <img src="/logoresearch.png" alt="LangChain RAG with React Demo Logo" height={'95%'} />
        </div>
        <div className="Main-Body">
          <div className="Main-Content">
            <Search />
          </div>
        </div>
        <div className="Main-Footer">
          <b>Disclaimer: Sample Application</b>
          <br />
          Please note that this sample application is provided for demonstration
          purposes only and should not be used in production environments
          without proper validation and testing.
        </div>
      </div>
    )
  }
}

export default App
The Main component centrally manages the application, initializing state variables for the API query and search results. It generates JSX code in the render function to define the main page layout, including elements like the rocket logo, a section containing the search component (details to follow), and a footer with a sample disclaimer about the application’s nature.
Search
The Search component serves as the primary interface for interacting with the FastAPI RAG Q&A endpoints and associated React functions.
import React, { useState } from 'react'
import { Button, Box, Stack, TextField } from '@mui/material'
import CircularProgress from '@mui/material/CircularProgress'

import SendIcon from '@mui/icons-material/Send'
import SearchResults from './SearchResults'
import SearchAnswer from './SearchAnswer'

export default function Search() {
  const [question, setQuestion] = useState('What is supersonic combustion')
  const [results, setResults] = useState('')
  const [isLoading, setIsLoading] = useState(false)

  const handleSerchByQuestion = () => {
    setIsLoading(true)
    setResults('')
    fetch(process.env.REACT_APP_API_HOST + '/search/qa/' + question)
      .then((response) => response.json())
      .then((res) => {
        setResults(res)
        setIsLoading(false)
      })
  }

  return (
    <Stack direction="column" spacing={2}>
      <Stack direction="row" spacing={0}>
        <TextField
          sx={{ width: '80%' }}
          variant="outlined"
          label="question"
          helperText="Ask a question of your data"
          defaultValue="What is supersonic combustion"
          value={question}
          onChange={(event) => setQuestion(event.target.value)}
        ></TextField>
        <Button
          variant="contained"
          endIcon={<SendIcon />}
          onClick={handleSerchByQuestion}
          sx={{ mb: 3, ml: 3, mt: 1 }}
        >
          Submit
        </Button>
      </Stack>
      {isLoading === true && (
        <Box
          sx={{
            width: '100%',
            alignContent: 'center',
            alignItems: 'center',
            textAlign: 'center',
          }}
        >
          <CircularProgress size={80} />
        </Box>
      )}

      {results !== '' && (
        <Stack direction="column" spacing={2}>
          <SearchAnswer resultText={results['text']} />
        </Stack>
      )}

      {results !== '' && (
        <SearchResults searchResults={results['ResourceCollection']} />
      )}
    </Stack>
  )
}
The component Search allows users to input a question, submit it, and then sends the results to the next search components. It utilizes state hooks (useState) to manage the question, search results, and loading status. When the user clicks the submit button, a function called handleSearchByQuestion is triggered. This function sets the loading state to true, clears any previous results, makes an API call to search for the question, and updates the state with the received results. SearchAnswer is responsible for handling the text answer from the API, while SearchResults handles the retrieved documents (ResourceCollection).
Search Answer
The SearchAnswer component is compact, as it presently solely presents the response (answer test) provided by the LangChain RAG FastAPI endpoint.
import React from 'react'

import { Box, Paper, Stack, Typography } from '@mui/material'

export default function SearchAnswer(resultText) {
  return (
    <Paper sx={{ p: 2 }}>
      <Stack direction="column" spacing={2} useFlexGap flexWrap="wrap">
        <Typography
          variant="subtitle1"
          sx={{ color: 'grey', fontSize: '12pt' }}
        >
          Answer:
        </Typography>
        <Box
          sx={{
            border: 1,
            borderColor: 'lightgray',
            borderRadius: 3,
            p: 1,
            fontSize: 14,
          }}
        >
          {resultText.resultText}
        </Box>
      </Stack>
    </Paper>
  )
}
The SearchAnswer component presents the search result within a Paper element, providing padding to distinguish it from the background. The displayed result text is obtained from the resultText property, which is populated with the response from the API.
Search Results
The Search Results component will display the retrieved documents from the Azure Cosmos DB for Mongo DB vector search, arranged in order of relevance. Furthermore, it will allow users to access the text content of the document and view the original document stored on an Azure Storage Account from Part 1.
import React, { useState } from 'react'

import { IconButton, Box, Paper, Typography } from '@mui/material'

import {
  Table,
  TableBody,
  TableCell,
  TableContainer,
  TableHead,
  TableRow,
} from '@mui/material'

import {
  Dialog,
  DialogActions,
  DialogContent,
  DialogContentText,
  DialogTitle,
} from '@mui/material'

import NotesTwoToneIcon from '@mui/icons-material/NotesTwoTone'
import CancelIcon from '@mui/icons-material/Cancel'

import ImageTwoToneIcon from '@mui/icons-material/ImageTwoTone'

import './SearchResults.css'

export default function SearchResults(searchResults) {
  const [content, setContent] = useState('')
  const [imageIdenfidier, setImageIdentifier] = useState('')
  const [imageData, setImageData] = useState('')

  const retrieve_image_data = (image_id) => {
    if (image_id) {
      fetch(process.env.REACT_APP_API_HOST + '/content/image/' + image_id)
        .then((response) => response.text())
        .then((body) => {
          return setImageData(body)
        })
    }
  }

  return (
    <Box>
      <Dialog open={imageIdenfidier !== ''} sx={{ m: '0px', p: '0px' }}>
        <DialogActions sx={{ m: '0px', p: '0px' }}>
          <IconButton>
            <CancelIcon
              onClick={() => {
                setImageIdentifier('')
              }}
            />
          </IconButton>
        </DialogActions>
        <DialogContent sx={{ m: '0px', p: '0px' }}>
          <DialogContentText sx={{ m: '0px', p: '0px' }}>
            {retrieve_image_data(imageIdenfidier)}
            <img src={imageData} alt="" width={'600px'} />
          </DialogContentText>
        </DialogContent>
      </Dialog>
      <Dialog open={content !== ''} sx={{ m: '0px', p: '0px' }} scroll="paper">
        <DialogTitle>Resource Content</DialogTitle>
        <IconButton
          sx={{
            position: 'absolute',
            right: 8,
            top: 8,
            color: (theme) => theme.palette.grey[500],
          }}
        >
          <CancelIcon
            onClick={() => {
              setContent('')
            }}
          />
        </IconButton>
        <DialogContent dividers>
          <DialogContentText>{content}</DialogContentText>
        </DialogContent>
      </Dialog>
      <Typography variant="subtitle1" sx={{ color: 'grey', fontSize: '10pt' }}>
        Document used to answer question:
      </Typography>
      <div className="Search-Results">
        <TableContainer component={Paper}>
          <Table sx={{ minWidth: '100%' }} aria-label="simple table">
            <TableHead>
              <TableRow>
                <TableCell>Title</TableCell>
                <TableCell>Source</TableCell>
                <TableCell align="center">Content</TableCell>
                <TableCell align="center">View Page</TableCell>
              </TableRow>
            </TableHead>
            <TableBody>
              {searchResults.searchResults.map((row, index) => (
                <TableRow
                  key={row.id}
                  sx={{ '&:last-child td, &:last-child th': { border: 0 } }}
                >
                  <TableCell component="th" scope="row">
                    {row.title}
                  </TableCell>
                  <TableCell component="th" scope="row">
                    {row.source}
                  </TableCell>
                  <TableCell align="center" component="th" scope="row">
                    <IconButton
                      onClick={() => {
                        setContent(row.content)
                      }}
                    >
                      <NotesTwoToneIcon />
                    </IconButton>
                  </TableCell>
                  <TableCell align="center" component="th" scope="row">
                    <IconButton
                      onClick={() => {
                        setImageIdentifier(row.resource_id + '/' + row.page_id)
                      }}
                    >
                      <ImageTwoToneIcon />
                    </IconButton>
                  </TableCell>
                </TableRow>
              ))}
            </TableBody>
          </Table>
        </TableContainer>
      </div>
    </Box>
  )
}
SearchResults is designed to facilitate the viewing and interaction with retrieved documents. Retrieved documents are presented in a ‘scrollable’ table format. For enhanced user experience, dialog boxes are employed to showcase content and images upon clicking the respective icons associated with each returned document. Furthermore, the function retrieve_image_data is implemented to procure image data from our Azure Storage Container for the selected document.
The series on LangChain RAG with React, FastAPI, and Cosmos DB has been a remarkable journey. This marks the conclusion of the three-part series, where we have accomplished significant milestones. These include loading vectors into Azure Cosmos DB for MongoDB vCore, uploading blobs into an Azure Storage Account, setting up our LangChain RAG interface with FastAPI, Python, and OpenAI, and ultimately developing our React web user interface. As a next step, you can enhance your LLM performance with Azure Cosmos DB semantic cache. Check out the article on how to do this: Improve LLM Performance Using Semantic Cache with Cosmos DB

Leave a Reply