
This article demonstrates the process of utilizing Azure Machine Learning to construct a classification model using risk data obtained from Azure Fabric. It discusses fundamental procedures such as data preprocessing, model training, and model registration within Azure Machine Learning. It also highlights the efficient handling of data through MLTable and incorporates AutoML for automated model selection and training, thereby enhancing the overall efficiency and accuracy of the machine learning workflow. Furthermore, the article examines the deployment of the trained model as a real-time endpoint for inferencing, making use of Azure Machine Learning’s capabilities
The diagram presented depicts the ‘high level’ procedure for accessing data from Microsoft Fabric through a OneLake shortcut registered as an Azure Machine Learning datastore. This entails the creation of a Tabular data asset for AutoML classification model training, followed by the integration of the trained model into a web application.


This article is derived from the document titled “Guided Journey – Azure Machine Learning: Training, Deployment and Integrating Models.” Access the document here.
In this article
- Prerequisites
- Azure Machine Learning
- Configure Fabric Data Access
- Create Azure Machine Learning Datastore
- Create Azure Machine Learning Compute Instance
- Create Azure Machine Learning Notebook
- Create Azure Machine Learning Tabular Data Asset
- Explore Azure Machine Learning Tabular Data Asset
- Azure Machine Learning – AutoML training for Tabular Data
- Azure Machine Learning – View Job Details
- Azure Machine Learning – Register Model from Job
- Azure Machine Learning – Model Deployment
- Azure Machine Learning – Model Consumption
Prerequisites
- If you don’t have an Azure subscription, create an Azure free account before you begin.
- If you do not have a dataset to use while walking through steps in this article, download the credit risk dataset from Kaggle.
Azure Machine Learning
Azure Machine Learning is a cloud service created to expedite and oversee the complete machine learning (ML) project lifecycle. It proves to be an indispensable tool for ML professionals, data scientists, and engineers, as it streamlines their daily processes of training and deploying models and managing machine learning operations (MLOps).
Create Workspace
Create a new Azure resource by logging into your Azure portal and navigating to the Azure portal dashboard. Once there, click on the “Create a resource” button and search for Azure Machine Learning in the search bar. Azure Machine Learning enables you to build, train, and deploy machine learning models using the Azure cloud. Tutorial: Create workspace resources – Azure Machine Learning | Microsoft Learn

Click on “Review + Create.” For the purposes of this tutorial, the default settings for Networking, Encryption, and Identity will be utilized.
Configure Fabric Data Access
To facilitate seamless data access for Fabric and Azure Machine Learning, without the need for redundant copying, one can leverage OneLake shortcuts and Azure Machine Learning datastores. By directing a OneLake shortcut and a datastore to the same storage account, a unified data environment is established. This ensures that both Fabric and Azure Machine Learning can seamlessly access and modify the underlying data.

Create a OneLake shortcut to the storage account
- Open the Synapse Data Engineering experience in Fabric.
- From the left-side panel, select your Fabric workspace to open it.
- Open the lakehouse that will be utilized to configure the connection. If a lakehouse is not already available, proceed to the Data Engineering experience in order to create one. In this particular scenario, a lakehouse named trusted is being utilized.
- In the left-side navigation bar, open more options for Files, and then select New shortcut to bring up the wizard.

5. Select the Azure Data Lake Storage Gen2 option.

6. In the Connection settings section, paste the URL associated with the Azure Data Lake Gen2 storage account.

- In the Connection credentials section:
- For Connection, select Create new connection.
- For Connection name, keep the default populated value.
- For Authentication kind, select Organizational account to use the credentials of the connected user via OAuth 2.0.
- Select Sign in to sign in.
- Select Next.
- Set up the path to the shortcut, relative to the storage account, if required. Utilize this option to configure the directory to which the shortcut will refer.
- Configure the Name of the shortcut. This name will be a path inside the lakehouse. In this example, name the shortcut datasets.
- Save the changes.
Create Azure Machine Learning Datastore
An Azure Machine Learning datastore serves as a point of reference to an established Azure storage account, offering a unified and user-friendly API for engaging with different storage types (Blob, Files, ADLS). This simplifies the identification of valuable datastores for team operations and safeguards connection details for credential-based access (service principal, SAS, key), eliminating the necessity to incorporate this information in your scripts.
Create a datastore that points to the storage account
- Go to your Azure Machine Learning workspace.
- Go to the Data section.
- Select the Datastores tab.
- Select Create.
- Configure the datastore as follows:
- For Datastore name, enter trusted_blob.
- For Datastore type select Azure Blob Storage
- Select the storage account from the wizard, using the Subscription ID, Storage account, and Blob container (file system).

To preview datasets in Azure Machine Learning Studio using a storage account, it is necessary to enable the “Use workspace managed identity for data preview and profiling” option in the datastore settings. Administer data authentication – Azure Machine Learning | Microsoft Learn
Create Azure Machine Learning Compute Instance
Use a compute instance as a fully configured and managed development environment in the cloud. A compute instance is capable of running multiple jobs in parallel and includes a job queue. As a dedicated development environment, it is not designed for shared use with other users in a workspace.
- Under Manage, select Compute.
- Select Compute instance at the top.
- In case there are no compute instances available, please select New located in the middle of the page.

4. Configure Required Settings
| Field | Description |
|---|---|
| Compute name | Name is required (3-24 characters) and must start with a letter. Valid characters are upper/lower case letters, digits, and the ‘-‘ character, which must be followed by a letter. The name must be unique across all computes in the Azure region; you’ll see an alert if it’s not. |
| Virtual machine type | Choose CPU or GPU. This type can’t be changed after creation |
| Virtual machine size | Supported virtual machine sizes might be restricted in your region. Check the availability list |
To avoid getting charged for a compute instance that is switched on
but inactive, you can configure when to shut down your compute
instance due to inactivity
5. Click “Review + Create”
Create Azure Machine Learning Notebook
An Azure Machine Learning notebook represents a web-based environment located within Azure Machine Learning studio, tailored for interactive Python coding. It provides support for widely used data science libraries and facilitates seamless integration with Azure services, thereby enabling data exploration, model training, and direct deployment within the Azure ecosystem.
- On the left side, select Notebooks.
- Select the + tool.
- Select Create new file.

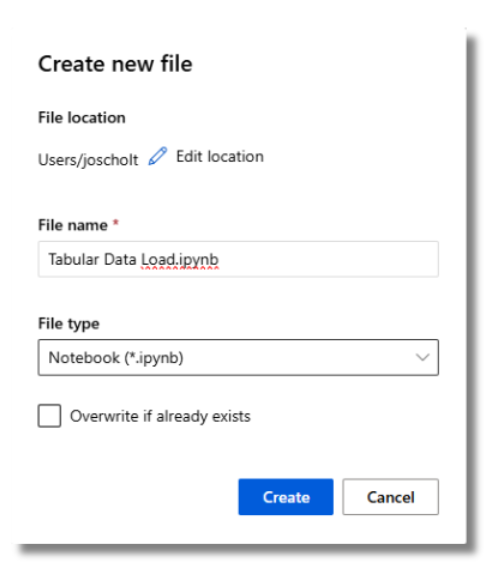
- Name the file.
- Select a file type – Notebook (*.ipynb)
- Select Create.
Select your recently created Compute Instance and a recent version of Python when running your Notebook.

Create Azure Machine Learning Tabular Data Asset
An Azure Machine Learning Tabular Data Asset (MLTable) effectively organizes data in a tabular format, comprising of rows and columns. It accommodates various data sources including CSV files, SQL databases, and data lakes. This structured arrangement plays a critical role in facilitating AutoML processes by guaranteeing the availability of clean data for automated model selection, training, and tuning.
Create handle to workspace
Reference the AML workspace using the MLClient by providing your Subscription ID, Resource Group name, and workspace name. You can locate these values by:
- In the upper right Azure Machine Learning studio toolbar, select your workspace name.
- Copy the value for workspace, resource group and subscription ID into the code.
- You’ll need to copy one value, close the area and paste, then come back for the next one.
import time
import mltable
from mltable import MLTableHeaders, MLTableFileEncoding, DataType
from azure.ai.ml import MLClient
from azure.identity import DefaultAzureCredential
from azure.ai.ml.entities import Data
from azure.ai.ml.constants import AssetTypes

# authenticate
credential = DefaultAzureCredential()
ml_client = MLClient( credential=credential,
subscription_id="<SUBSCRIPTION_ID>",
resource_group_name="<RESOURCE_GROUP>",
workspace_name="<AML_WORKSPACE_NAME>", )
Access data from a datastore URI
A Datastore URI is a Uniform Resource Identifier that serves as a reference to a storage location (path) on your Azure storage account. You can conveniently obtain the datastore URI from the Studio UI by following these steps.
- Select Data from the left-hand menu, then select the Datastores tab.
- Select your datastore name, and then Browse.
- Find the file/folder you want to read into Pandas and select the ellipsis (…) next to it. Select Copy URI from the menu.

# Path to your data within the Datastore - pasted from Datastore URI
data_path = [{"file":"azureml://subscriptions/<subscription_id>/resourcegroups/rg-riskmodel-demo-centralus/workspaces/aml-riskdemo-centralus/datastores/trusted_blob/paths/credit_risk_dataset.csv"}]
Create MLTable and Data Asset
Creating an MLTable and a data asset in Azure Machine Learning entails the upload of the MLTable to cloud storage, where it is bookmarked for convenient access by team members under a user-friendly name. Furthermore, the data asset is meticulously versioned to facilitate seamless tracking and management.
# create an MLTable from the data files
tbl = mltable.from_delimited_files(
paths=data_path,
delimiter=",",
header=MLTableHeaders.all_files_same_headers,
infer_column_types=True,
include_path_column=False,
encoding=MLTableFileEncoding.utf8,
)
# save the data loading steps in an MLTable file
mltable_folder = "./credit_risk"
tbl.save(mltable_folder)
# set the version number of the data asset to the current UTC time
VERSION = time.strftime("%Y.%m.%d.%H%M%S", time.gmtime())
# show the first few records
print(tbl.show())
# Define the Data asset object
my_data = Data(
path=mltable_folder,
type=AssetTypes.MLTABLE,
description="credit risk table created from exiting store",
name="credit_risk",
version=VERSION ,
)
# Create the data asset in the workspace
ml_client.data.create_or_update(my_data)
Explore Azure Machine Learning Tabular Data Asset
Now that the Tabular Data Asset (MLTable) has been created, it is time to delve into the data it contains.
- Click on Data on the left sidebar.
- Select Data assets.
- Choose the specific data asset (e.g. credit_risk).

4. Click on Explore to delve into the data.

Azure Machine Learning – AutoML training for Tabular Data
Automated machine learning (AutoML) is a procedure designed to meticulously determine the optimal machine learning algorithm tailored to your specific dataset. This enables the rapid generation of models to meet your requirements. In this instance, we will leverage AutoML to efficiently ascertain the most suitable classification model for our risk dataset.
- Navigate to the left pane. Select Automated ML under the Authoring section.
- Select + New automated ML job and populate the form.

3. Specify an Experiment Name.

- Select Classification as the ‘task type’.
- Select the existing data asset created earlier in the article.

Requirements for training data:
- Data must be in tabular form.
- The value you want to predict (target column) must be present in the data.
6. Select the Target column (value you want to predict).

- (Optional) Enable Automatic featurization in the Additional configuration settings form to apply default techniques. In View featurization settings, you can customize these defaults. Learn how to customize featurizations.
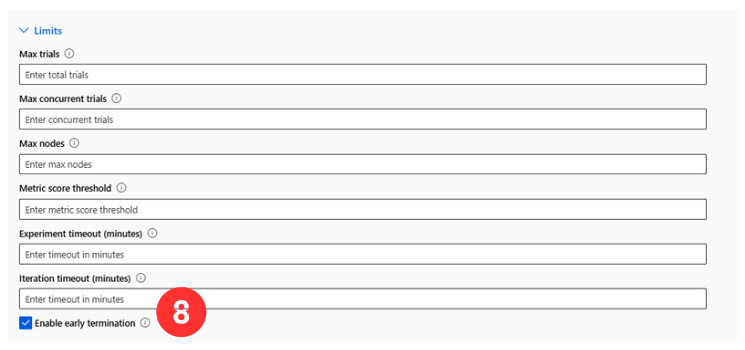
- Select Enable-early termination to end the job if the score is not improving in the short term.
- Select Compute instance for compute type, in order to use the compute created earlier in this article.
- Select the created Azure ML compute instance.

11. Submit training job.
Azure Machine Learning – View Job Details
The Job Detail screen opens to the Overview tab, where a comprehensive summary of the experiment job is presented, along with an overview of the ‘Best model’ – the top-performing model, determined based on the evaluation metrics.

The Models tab lists the models created, ordered by their metric scores. By default, the highest-scoring model based on the chosen metric appears at the top. As the training job progresses, newly tested models are added to the list.

Explanations provides insights into how models make predictions, highlighting feature importance and model behavior through global and local explanations. It supports interpretability techniques like SHAP and LIME, integrated with Azure ML to enhance transparency, compliance, and trust in AI systems.

Azure Machine Learning – Register Model from Job
It is recommended to register your model and environment before deployment to Azure. This allows you to specify their registered names and versions during deployment, enabling you to reuse these assets without re-uploading them each time, which enhances reproducibility and traceability.
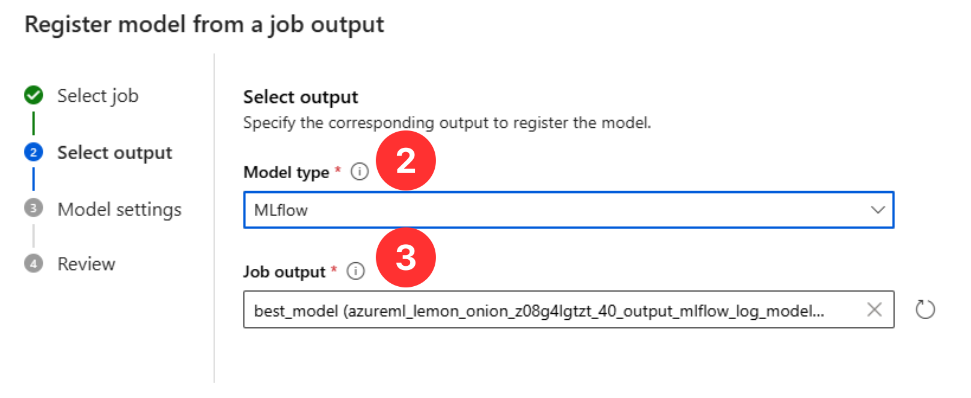
- From your recent model run, click + Register model.

- Select MLflow as the Model type.
- Use the best_model Job output.
Model registries with MLflow
Integrated seamlessly with MLflow, Azure Machine Learning offers a streamlined approach to supporting the complete model lifecycle for users who are accustomed to using the MLflow client.
- Select Next.
- Enter a friendly Name for the model; for example, risk-model-1.
- Leaving Version ‘blank’ will autoincrement the registered model version number.
- Select Next, and then Register to complete registration.

Azure Machine Learning – Model Deployment
Azure Machine Learning facilitates real-time inferencing through the deployment of models to online endpoints, enabling the generation of outputs from new input data. These outputs, commonly referred to as “predictions,” can encompass results for tasks such as classification and clustering.
Deploy Real-time Endpoint from Registered Model
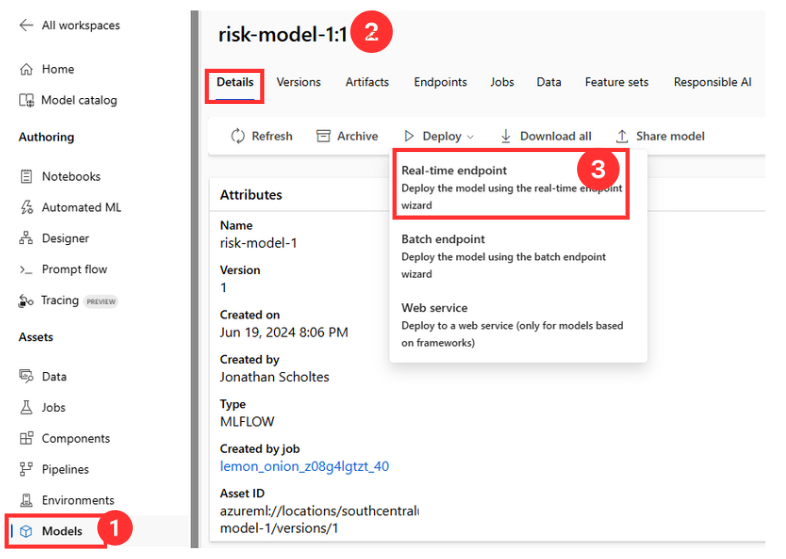
- Select Models from the Navigation.
- Select the Register model to deploy (risk-model-1(version 1)).
- Select Real-time endpoint from Deploy.
- Select the compute for the deployment by specifying Virtual machine type and Instance count.
- Specify Endpoint Name and Deployment Name.
Azure Machine Learning – Model Consumption
Consuming an Azure Machine Learning online endpoint through a web application supports real-time predictions, thereby improving responsiveness and enhancing the user experience. This approach provides scalability, seamless integration, strong security, and centralized model management, guaranteeing both efficiency and secure operation.
- Navigate to the Endpoints section and find your deployed online endpoint.
- Select Consume.
- Note down the endpoint URL and any necessary authentication keys or tokens.
- Copy the code from the Consumption options.
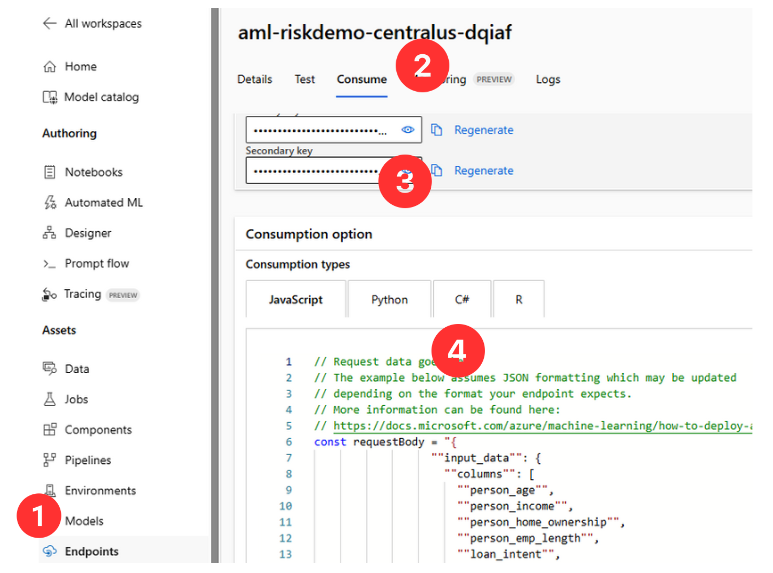
Integrate real-time predictions into your application by incorporating the endpoint URL, authentication keys, and the example code provided from Consumption options.
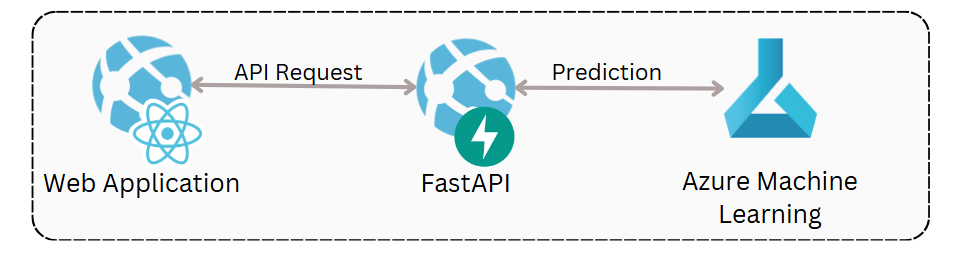
Example Integration:
The Python endpoint code can be seamlessly integrated into an existing API. An example of this is integrating it with a Python FastAPI to offer real-time risk inference for ReactJS web applications.

Conclusion
Azure Machine Learning is an essential cloud service that accelerates and simplifies the entire machine learning project lifecycle, from data access and model training to deployment and real-time inferencing. By providing a comprehensive suite of tools and seamless integration with other Azure services, it supports data scientists, ML professionals, and engineers in their daily tasks, enhancing productivity and efficiency. The detailed steps outlined for creating a workspace, configuring data access, creating compute instances, managing tabular data assets, and deploying models showcase the robust capabilities of Azure Machine Learning. Embracing this platform can lead to more streamlined operations, faster insights, and more effective integration of machine learning models into web applications, ensuring a powerful and scalable solution for real-time predictions.

Leave a reply to Anonymous Cancel reply