
After completing the development of your LangChain Agent or LLM application, a crucial question arises: “How do I ensure the LLM application continues to perform as expected?” This is where a platform like LangSmith becomes invaluable. LangSmith seamlessly adds trace capabilities to your LLM application, bridging the gap between your development prototype and a production-grade enterprise application. In this article we will utilize the LangChain Agent developed in the article “Empower Your AI Agent with Azure Cosmos DB” and implement tracing with LangSmith to monitor the agent’s behavior effectively. We will walk through the steps required to get started with LangSmith and add tracing to an existing application.
What is LangSmith?
LangSmith is a specialized platform that provides comprehensive monitoring and trace capabilities for LLM applications. It empowers developers with the tools needed to gain deep insights into their AI agent’s behavior, performance, and operational health. By integrating LangSmith, you can bridge the gap between development prototypes and robust, production-grade enterprise applications.
Why Use LangSmith?
Transitioning an LLM application from a prototype to a production environment involves numerous challenges, including maintaining performance, ensuring reliability, and scaling effectively. LangSmith addresses these challenges by providing a robust set of tools that:
- Enhance visibility into the AI agent’s operations, making it easier to understand and optimize performance.
- Facilitate proactive maintenance and issue resolution, reducing downtime and improving user satisfaction.
- Support continuous improvement through detailed analytics and reporting, driving better decision-making and strategic planning.
Practical Application: Integrating LangSmith with Your LangChain Agent
To illustrate the power of LangSmith, consider a practical example where we leverage the LangChain Agent developed in the article “Empower Your AI Agent with Azure Cosmos DB“. By applying LangSmith, we can add advanced tracing capabilities to monitor the agent’s behavior. This integration helps us ensure that the agent performs as expected in a production environment, maintaining high standards of reliability and efficiency.
Setting Up Your LangSmith Project
To begin, you will need to create an account with LangSmith. For the purposes of this article, the ‘Developer’ plan is recommended, as it provides ample trace capacity to monitor and test our AI Travel Agent.

Now that your Developer plan has been set up, you will be able to initiate a new project directly from the LangSmith landing page.

Give your project a meaningful name, for example “Travel Agent,” then proceed to click Submit.

When accessing the “Projects” section, you may observe that “Travel Agent” is not listed. Only projects with ‘runs’ will be displayed. To view all projects, simply click on “Sort by Name.”


If you’ve reached this point, you have successfully set up your LangSmith project and are prepared to integrate it with your LangChain Agent.
Integrating Tracing with Your LangChain Agent
Updating the LangChain Agent developed in the article “Empower Your AI Agent with Azure Cosmos DB” to integrate LangSmith is a straightforward process. It involves three simple steps: installing LangSmith, updating the environment variables, and utilizing the context manager to initiate logging.
Installing Python Requirements
We will need to add LangSmith to the requirements.txt file in the api directory. The updated requirements file should look as follows:
fastapi
uvicorn
weaviate-client==3.24.1
python-dotenv==1.0.0
pymongo
tiktoken
langchain-openai
langchain
langchain-community
langchain-mongodb
langsmith
openai
Activate your environment and install dependencies by running the following command from the api directory:
venv\Scripts\activate
python -m pip install -r requirements.txt
Updating the Environment Variables
Update the ‘.env’ file in the api directory to include the four LangSmith variables.
OPENAI_API_KEY="**Your Open AI Key**"
MONGO_CONNECTION_STRING="mongodb+srv:**your connection string from Azure Cosmos DB**"
LANGCHAIN_TRACING_V2=true
LANGCHAIN_ENDPOINT="https://api.smith.langchain.com"
LANGCHAIN_API_KEY="<your-api-key>"
LANGCHAIN_PROJECT="Travel Agent"| Environment Variable | Description |
|---|---|
| OPENAI_API_KEY | The key to connect to OpenAI API. If you do not possess an API key for Open AI, you can proceed by following the guidelines outlined here. |
| MONGO_CONNECTION_STRING | The Connection string for Azure Cosmos DB for MongoDB vCore – demonstrated here. |
| LANGCHAIN_TRACING_V2 | Boolean value for V2 tracing: default value is ‘true’ |
| LANGCHAIN_ENDPOINT | LangSmith endpoint. default value is https://api.smith.langchain.com. You can verify your endpoint under the LangSmith project setup page. |
| LANGCHAIN_API_KEY | The key to connect to LangSmith API. If you do not possess an API key, you can proceed by following the guidelines outlined below. |
| LANGCHAIN_PROJECT | The LangSmith project to log run/trace details to. |
LangSmith API Key
If you do not possess an API key for LangSmith, please navigate to settings (the gear icon) from the LangSmith landing page.

Then select Create API Key.

Create a new key for our AI Travel Agent, then click Create API Key.

Copy your key and paste it into your environment variable file, LANGCHAIN_API_KEY.

Initiate Logging with Context Manager
With LangSmith installed and configured, we are able to proceed with updating our code to initiate logging. Given that we utilized LangChain for our AI Agent, the necessary adjustments to incorporate LangSmith are minimal, as LangSmith seamlessly integrates into LangChain.
We will only be working with the FastAPI code from Empower Your AI Agent with Azure Cosmos DB, which is located in the api directory.
Original Code without LangSmith
Below is the original agent invocation code from our Python FastAPI application. The TravelAgent.py file is straightforward, as our agent, agent_with_chat_history, and its dependencies (tools, prompt, and LLM) are initialized and configured in the init.py file. In TravelAgent.py, we invoke our agent using the user’s input along with the session ID to maintain conversation memory. The agent’s output and response time are then returned encapsulated in a PromptResponse (model/prompt).
service/TravelAgent.py
from .init import agent_with_chat_history
from model.prompt import PromptResponse
import time
from dotenv import load_dotenv

load_dotenv(override=True)


def agent_chat(input:str, session_id:str)->str:

    start_time = time.time()

    results=agent_with_chat_history.invoke(
    {"input": input},
    config={"configurable": {"session_id": session_id}},
    )

    return  PromptResponse(text=results["output"],ResponseSeconds=(time.time() - start_time))
Code with LangSmith
Introducing the LangSmith code follows a straightforward process. We begin by incorporating the tracing_v2_enabled tracer context. The next step involves enclosing our agent invoke with the tracer, accomplished by adding the line: with tracing_v2_enabled(). Additionally, metadata is included to enable the filtering of each agent session, thereby capturing the session_id.
service/TravelAgent.py
from .init import agent_with_chat_history
from model.prompt import PromptResponse
import time
from dotenv import load_dotenv
from langchain_core.tracers.context import tracing_v2_enabled

load_dotenv(override=True)


def agent_chat(input:str, session_id:str)->str:

    start_time = time.time()
    results=None
    with tracing_v2_enabled():
        results=agent_with_chat_history.invoke(
        {"input": input},
        config={"configurable": {"session_id": session_id},"metadata":{"session_id":session_id}}

        )

    return  PromptResponse(text=results["output"],ResponseSeconds=(time.time() - start_time))
These changes are all that’s needed to begin capturing run details with LangSmith!
Capturing Trace Data
In order to commence capturing our trace data with LangSmith, the first step is to initialize the FastAPI server. Please execute the following command from the api directory to initiate the server.
python main.pyThe FastAPI server launches on the localhost loopback 127.0.0.1 port 8000 by default. You can access the Swagger documents using the following localhost address: http://127.0.0.1:8000/docs

With the API running, we have the ability to execute the following command from the web directory to initiate the React web user interface.
npm startRunning the command above will launch the React JS web application.

Click on ‘Effortlessly plan your voyage’ to launch the travel assistant.

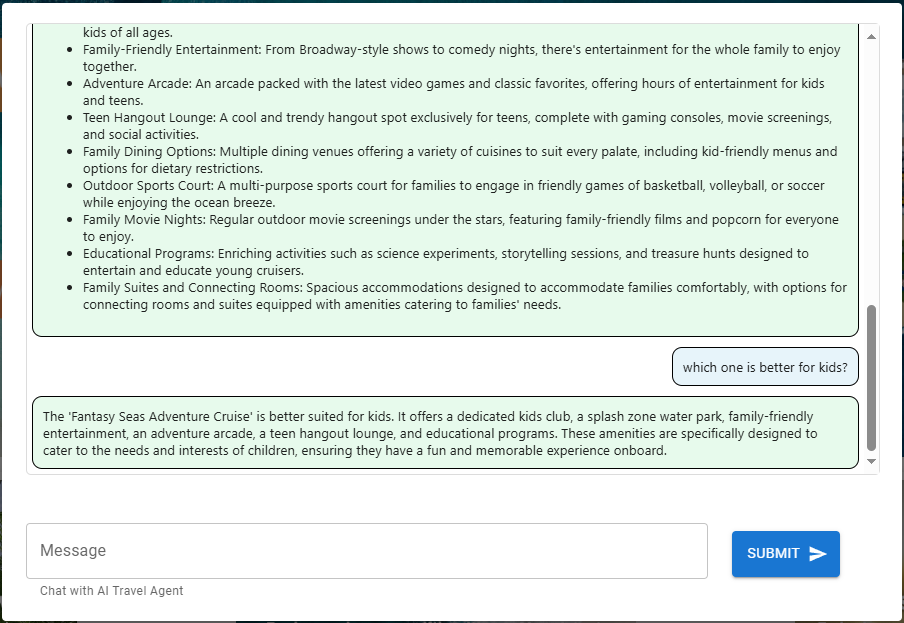
Finding a ‘Relaxing Vacation’ with our LangChain Agent
Ask the agent for assistance finding a relaxing vacation.

Asking for a ‘relaxing’ vacation will result in a recommendation for the Tranquil Breeze Cruise and the Fantasy Seas Adventure Cruise as they are anticipated to be the most ‘relaxing’ cruises available through the vector search.

When reviewing our ‘Travel Agent’ project in LangSmith, we’ll notice that a transaction has logged this agent interaction, showing a latency of approximately 14 seconds and utilizing around 1,000 tokens (prompt and completion).

Upon further examination of the operation, it becomes evident that the agent utilized the ‘vacation_lookup’ function to address this request. Analyzing each trace component of the AgentExecutor will provide valuable insights into the handling of this interaction.

Refining Results through Memory
We can enhance our search by identifying the cruise that is most suitable for children, in order to evaluate our agent’s handling of the request.
We completed the second task much more rapidly, taking only 1.60 seconds.

This request is simply using the chat history (memory) from the conversation to answer the question thus resulting in a low latency.

Tracing Additional LangChain Agent Function
As you search for your destination and book your cruise, you will be able to view the traces for each corresponding function and tool utilized.
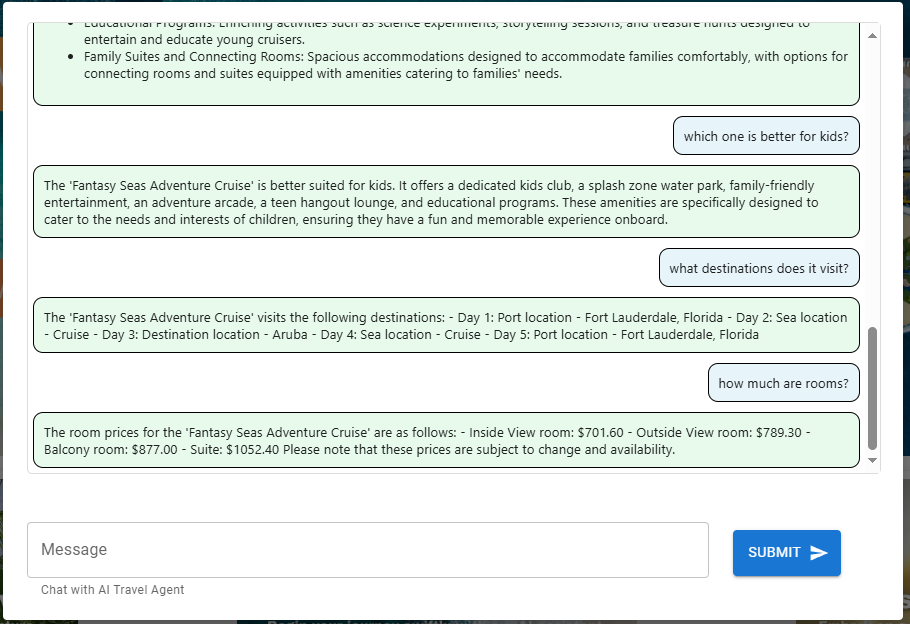
Asking inquiries regarding destinations and accommodations will prompt the agent to invoke the ‘itinerary_lookup’ function.

Filtering by Metadata
During ongoing testing, you will likely start new sessions with the React JS web application. When this occurs, you can filter your LangSmith project runs by selecting the metadata session_id

Conclusion
Transitioning an LLM application from prototype to production involves challenges like maintaining performance, ensuring reliability, and scaling effectively. LangSmith addresses these by enhancing visibility into AI operations, facilitating proactive maintenance, and supporting continuous improvement through detailed analytics. In this article we demonstrated how to quickly integrate LangSmith into an existing LangChain Agent. This integration ensures your agent performs reliably and efficiently in a production environment.

Leave a Reply